Navigating in the Web site requires an understanding of the key elements of the user interface. The list that follows is ordered to follow the layout of the application pages, from top to bottom and left to right.
The page tabs provide one-click access to pages within the site. Click a page tab to access the corresponding page.
You can use the thread bar to retrace your steps in the Web site. You can return to an earlier point in the path by clicking the appropriate hyperlink on the thread bar. The thread bar appears below the page tabs.
A list contains rows of records with column headers. Each record contains multiple fields.
If there are more records than can be displayed in the list, you can use the record navigation buttons located at the top of the list to move up and down in the set of records.
To see details for a record in a list, click the hyperlink for the record.
A form contains information about a single record.
If you have authorization to edit the record, you can click the Edit button to update the record in a list or a form.
The record navigation buttons are located in the top right corner of each form. Use the left arrow button to navigate to the previous form record and the right arrow button to navigate to the next form record.
The record number for a form appears in the top right corner of the form between the record navigation buttons. The record number changes as you navigate between forms. An estimate of the total number of form records appears to the right of the record number. You must navigate to the last form to see the exact number of form records to the right of the record number.
You use field controls to define data for records within a form or list. To use field controls to edit records found in a list, you must click within the field to activate the control.
| Control | Description |
Text field
|
A text field is a box in a form or a list in which you can type text. |
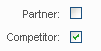
Check boxes
|
Check boxes let you select one or more options in a set. When you select a check box, an x or a check mark appears in the box. |
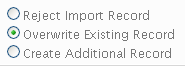
Option buttons
|
Option buttons, also known as radio buttons, let you select one of several options in a set. An option button appears as a circle, with a smaller filled circle inside when the option is selected. |
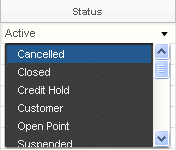
Drop-down list
|
A drop-down list allows you to click a down arrow to the right of a field to select from a list of available values. You can type the field value in a field for drop-down list. You can also type part of the text string for a field value to automatically decrease the number of available values that appears in the drop-down list for the field, and then you can select the appropriate value for the field. |
|
Single select button
|
Launches a single selection dialog box. |
Multiple select button
|
Launches a multiple selection dialog box. |
|
|
Launches a calendar control for entering a date and optionally, time, in a date or date and time field. You can also type a date (or date and time) directly into a field. |
|
|
Launches a currency calculator or a calculator for entering amounts. |
Managers and the Siebel administrator can use notifications (or broadcast messages) to communicate information to their direct reports and to others in the organization. If the Siebel administrator provides you with the proper authority, then you can customize the behavior of notifications in your user preferences.
![]()
You can access notifications by using the Notification icon. The Notification icon, which appears to the left of the drop-down list for the Saved Queries field in the top right corner of the application window, shows the number of notifications that you have not yet read. If this icon is blinking, then you have at least one unread message with a level of importance (or severity) of Urgent with Alert.
Colors in notifications indicate the level of importance (or severity) of the message or of specific text in the message. Table 8 describes the level of importance for each color in the preconfigured Siebel application. The following table lists the colors for notifications:
| Color | Level of Message Importance |
| Gray | Normal |
| Yellow | High |
| Red | Urgent |
| Red | Urgent with Alert |
![]()
You can select saved queries from the drop-down list for the Saved Queries field in the top right corner of the application window. In this list, you can access your saved queries and the predefined queries established by your organization.
You use selection dialog boxes to fill in fields in lists or forms.
 You sort data in lists by clicking the sort icons (shown to the left) in the column headers. These icons do not appear in columns that you cannot use to sort records.
 If records in a list are already in a specific sort order, the state of the icons in the column headers shows the sort order. If the upper triangle is filled in (as in the example to the left), the records in the list are sorted in ascending order by the value in that column. If the lower inverted triangle is filled in, the records in the list are sorted in descending order by the value in that column.
Copyright ©2008,2014, Oracle. All rights reserved.